
Freebies are awesome. Whether it’s a printable, checklist, template, questionnaire, ANYTHING — people love free stuff. And lucky for them, us bloggers like making free stuff. But we want a little something in return…like email subscribers!
There’s absolutely nothing wrong with wanting more email subscribers — it just gives you more opportunity to change your readers’ lives with your awesome content. More email sign-ups = VERY GOOD. But it’s not always easy to get people on your lists, right?
That’s where freebies come in. A few weeks ago I talked about how to craft the perfect blog post — and in that article I mentioned creating a content upgrade (otherwise known as a freebie) for your readers. Basically it’s “the next logical step” for someone who has just read your post. For example, if you’ve written a post about time management, maybe you would include a printable at the end of your post that outlines a time management method or schedule.
Not only does the freebie help the reader take things to the next level and really improve their life, but it also makes you more memorable for them. And if you get their email address, you can communicate with them again and again, giving what you have to offer and receiving followers in the process! Sounds like a win-win, right?
YES. IT REALLY IS. So today I’m going to show you the technical side of this; how I make a freebie, set up an email list, and create a sign-up form that makes the goods easily accessible to your readers. (And keeps them coming back for more.) Let’s go!
Step 1: Create Your Freebie
This is the funnest part: actually designing your freebie. Like I said before, it can be anything: a checklist, printable, template, worksheet, even a poster or quote. Try to make it as beneficial as possible so that readers are super excited to get their hands on it.
Ask yourself “what is the next logical step for my reader?” and see what you come up with.
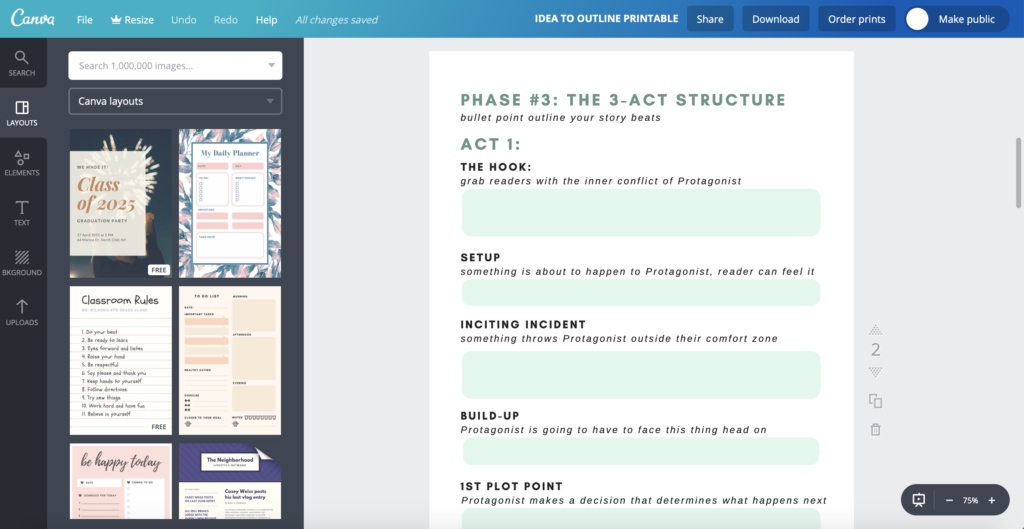
As for creating the actual freebie, I like to use Canva because it allows you to save your document in PDF format, and it has the option to make your document multiple pages long. Canva also has hundreds of pre-made templates to choose from. So if you want to make a beautiful worksheet but don’t know how to begin designing one, they’ve got you covered. Just pick a template and customize to your heart’s content!
When you finish designing your freebie, download it to your computer as a PDF and make sure it’s saved somewhere you can find it easily.
Step 2: Start an Email List
If you already have an email list for your blog followers, awesome. DON’T USE IT. Not for this. What I like to do with freebies is create a separate “themed” list for each printable. What do I mean by that? Essentially, I make email lists according to the THEME of the content upgrade, instead of just putting everyone on the same list. Why? Because it’s a super simple way to keep your subscribers organized and only give them content that you know they’re going to dig.
Here’s the annoying thing that a lot of bloggers get wrong with opt-ins. You opt-in for something like free stock photos, and you end up on their generic email list, which means you receive ALL their emails — anything from how to sell an ebook to how to organize a wardrobe. Nothing to do with the stock photos you originally opted in for.
This is why I like to make separate lists for every freebie. If I give out a blogging/business related printable, then I don’t want to send those people an article about writing stories. I want to send them content that will better suit their needs and keep them subscribed.

So head on over to MailChimp and create a new list. If you don’t use an email automation service like MailChimp, YOU NEED TO. Seriously, it’s free up to 2,000 subscribers and in my opinion it’s a must-have if you want to take your blog and brand to the next level. Bonus: it’s SUPER easy to use.
Name your email list something relevant to the kind of content you’ll be sending your subs — so that you keep everyone organized. This will end up being the list not just for one freebie, but for EVERY freebie that falls into this category.
Step 3: Make a Signup Form
For this step, I recorded a little video walkthrough for you (because I don’t want to include a million screenshots lol.) But there’s no audio so you can watch it anytime, anywhere. In the video below I show you how I make a list, make a signup form for that list, and include a link to the freebie on the other side of the signup process.
If you’ve ever researched doing content upgrades before, you might have seen people send their freebie to their subscribers through a “welcome email.” This means as soon as a person subscribes to your list, an automatic email goes to their inbox with the freebie. But I don’t like to do it this way, for a lot of reasons (I’ve had the welcome email go to the spam folder and subscribers can’t find it! not good!)
So what I prefer to do (and what you’ll see me do in this video walkthrough) is include the download link to the PDF on the thank you confirmation page. That way the reader still has to subscribe to get the freebie, but they don’t have to wait around for it to show up in their inbox.
This also gives you the opportunity to set up a different welcome email that isn’t as time-sensitive. For instance, on my character-building series list (the list you see in the video) I have a welcome email automation set up so that subs get the two other videos in my character-building series sent to their inbox 1 hour after they opted in for the PDF freebie.
Step 4: Add Your Signup Form to Your Blog Post
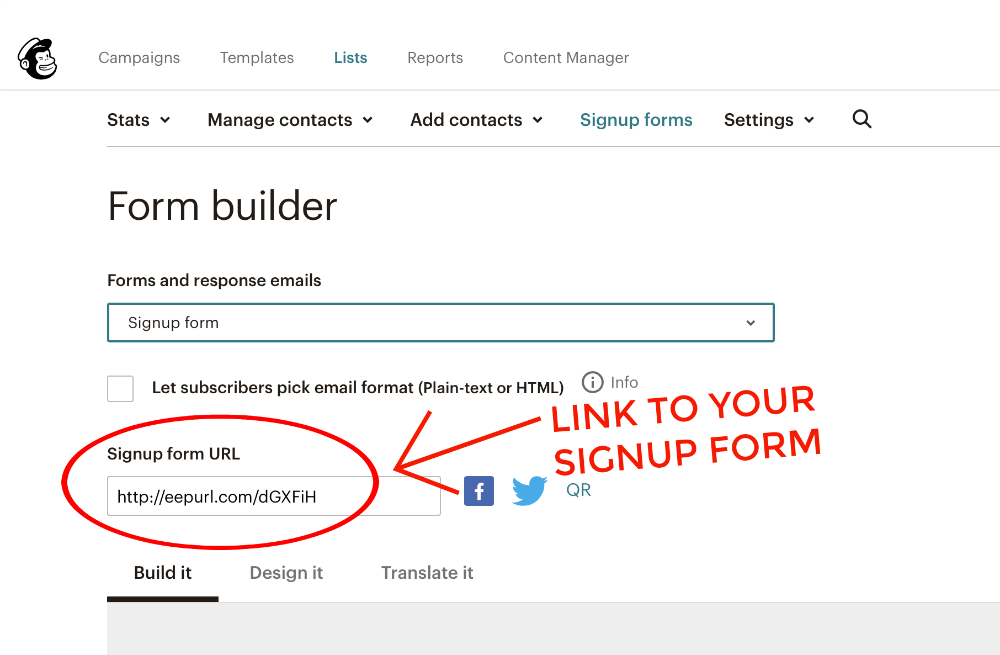
Obviously, this is the most important part — actually inserting your shiny new signup form into your blog post and making people want to opt in! I like to link the form in multiple places, plus add a pretty image that readers can’t help but click. The magic link to your signup form can be found right here in MailChimp (when you’re on the form builder page):
Step 5: Nurture, Nurture, Rinse, Repeat
Congratulations! You’ve successfully made an epic freebie, email list, signup form, and added it to your blog post. Your followers are going to be thrilled. But now you might be asking yourself a question:
What do I give these subscribers once I have them?
Well, after reading this post you should know what not to give them: anything that isn’t relevant to them or isn’t similar to the content they opted in for. < that’s a sure-fire way to lose subscribers. If you want to keep them on your list, you have to nurture them with content you know they’re going to love.
Chances are, you already have a ton of this stuff in your archives. Send them a piece of high quality content at least twice a month, maybe once a week. Don’t be annoying, but don’t be shy either! If they loved that one blog post enough to get a freebie from it, they’re going to love anything else you have on this topic.
Nurturing is so important because it keeps your audience “warm” and ready to consume more of your content — maybe even pay for some of it. If you’re going to offer a product or service in the future, these lists will be gold — filled with potential customers and clients. Don’t look at it like you’re conning them into being your potential customer. Instead, see it how it is: you’re doing THEM a service. You’re improving their life with your content! And they are improving your life by supporting your efforts to do what you love.
So go forth, make awesome freebies, and get email signups on autopilot!

TALK, BRO
Have you ever done a freebie/content upgrade for a blog post? What is your favorite platform to design freebies and printables on? Are you excited to make a freebie after reading this post?! I hope so. 😉
LOVE THIS POST? PIN IT!